
Air Fryer Chicken Katsu Cabbage Bowls
Crispy air fryer chicken katsu served over tender cabbage and rice bowls makes a quick, family-friendly dinner.
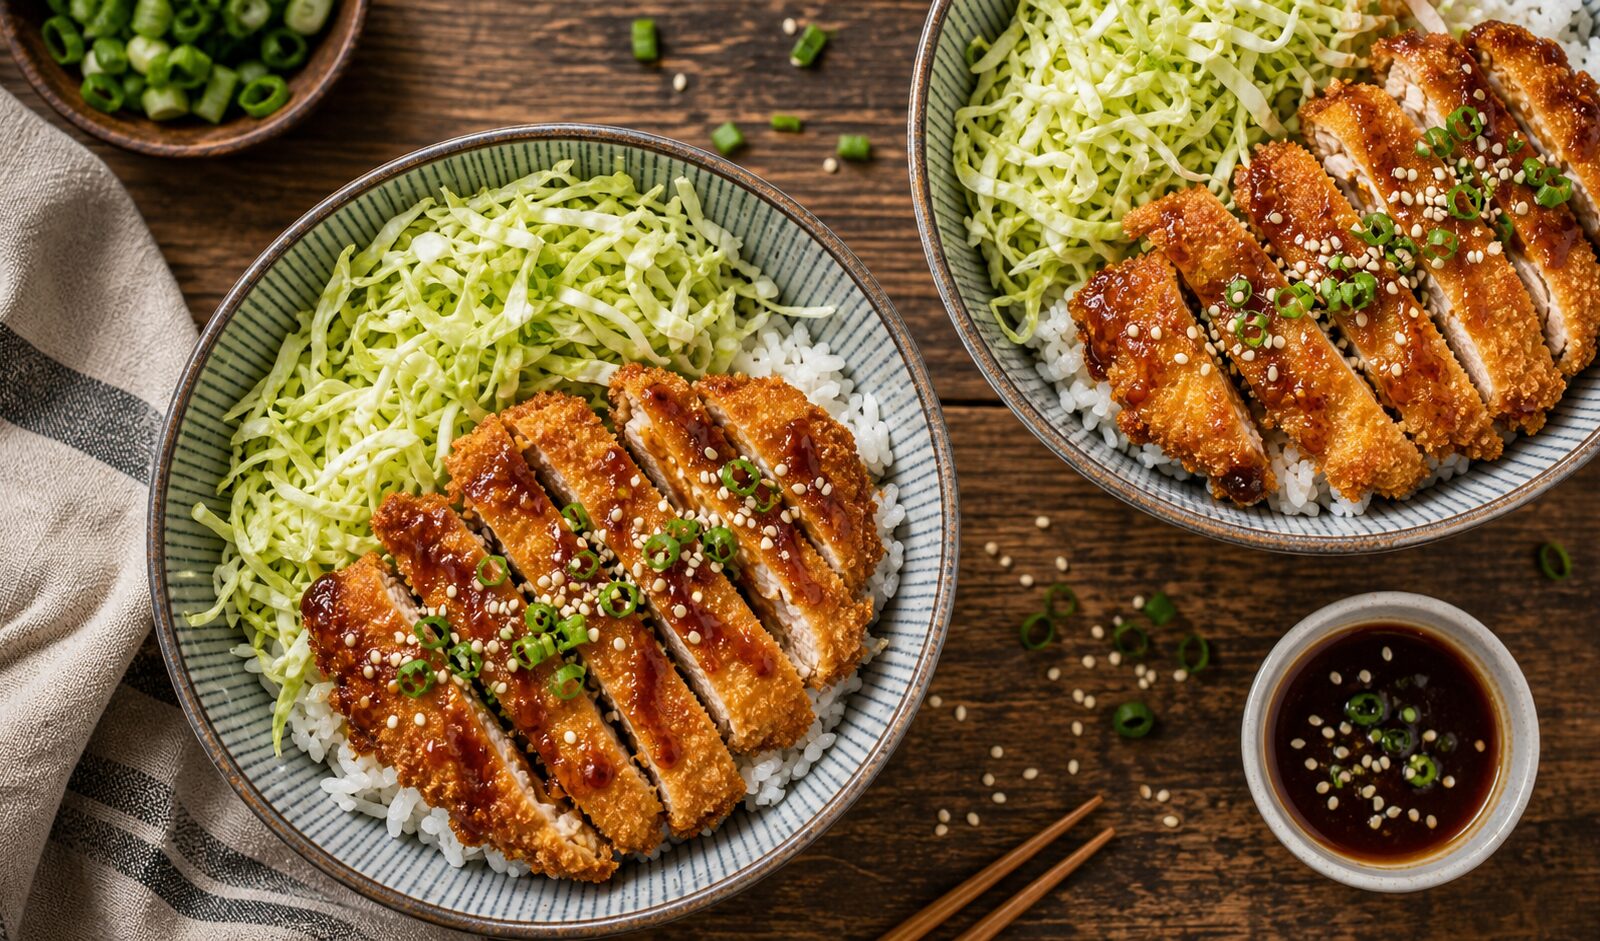
This air fryer chicken katsu cabbage bowls recipe is a total weeknight winner. You get that shatteringly crispy chicken katsu without deep frying, served over a bed of shredded cabbage and steamed rice. It's a complete meal in a bowl that feels satisfying but not heavy.
If you love takeout-style katsu but want a lighter version you can make at home any night, these cabbage rice bowls are the answer. The air fryer gives you perfect golden brown chicken cutlets with minimal oil, and the cool, crunchy cabbage pairs beautifully with warm rice and savory katsu sauce. It's one of those easy dinners that feels special but comes together in about 30 minutes.
These chicken katsu cabbage bowls are perfect for busy families because they use simple pantry ingredients and the air fryer does most of the work. Whether you're new to air frying or a seasoned pro, this air fryer katsu chicken recipe is straightforward and almost impossible to mess up.
Why You'll Love This Recipe
- Air fryer magic: You get crispy, golden chicken katsu with hardly any oil. The air fryer circulates hot air to create that signature crunchy crust.
- Fast enough for a weeknight: From start to finish, these bowls are on the table in about 30 minutes. No lengthy marinating or complicated steps.
- All in one bowl: Cabbage, rice, and chicken katsu come together in a satisfying bowl meal. Less cleanup, more happy faces.
- Beginner-friendly: If you can coat chicken in breadcrumbs and press a button, you can make this recipe. Perfect for new cooks.
- Lighter than deep-fried: The air fryer cuts down on oil significantly compared to traditional frying, so you can enjoy katsu more often.
- Customizable toppings: Drizzle with homemade katsu sauce, add a sprinkle of sesame seeds, or throw on some pickled ginger. Everyone can make their bowl their own.
- Budget-friendly: Uses common ingredients like chicken breast, cabbage, and panko. Great for stretching your grocery budget.
- Meal prep friendly: Cook extra chicken and cabbage ahead of time for quick lunches or dinners throughout the week.
Ingredients
- 2 boneless, skinless chicken breasts (about 6 oz each) – You can also use chicken thighs for a juicier result.
- Salt and black pepper – To season the chicken.
- 1/2 cup all-purpose flour – Helps the egg wash stick.
- 2 large eggs – Creates the binding layer for the panko.
- 1 cup panko breadcrumbs – Panko gives the crispiest texture. Regular breadcrumbs won't work as well.
- 1 tablespoon neutral oil – For spraying or brushing on the chicken before air frying. Use avocado, canola, or vegetable oil.
- 4 cups finely shredded green cabbage – About half a medium head. You can use a bag of coleslaw mix to save time.
- 2 cups cooked jasmine rice – Short-grain or basmati also work well.
- Optional Garnishes – Sesame seeds, sliced green onions, pickled ginger, or a drizzle of katsu sauce.
For the simple katsu sauce:
- 1/4 cup ketchup
- 2 tablespoons Worcestershire sauce
- 1 tablespoon soy sauce
- 1 tablespoon sugar
- 1 teaspoon Dijon mustard (optional)
Whisk together all sauce ingredients in a small bowl until smooth. Set aside.
Optional Substitutions
- Chicken thighs: Swap chicken breasts for boneless, skinless thighs. They'll be juicier and more forgiving if you cook them a minute or two longer.
- Gluten-free panko: Use gluten-free panko or crushed rice crackers for a gluten-free version. The texture will still be crispy.
- Coconut aminos: Replace soy sauce in the katsu sauce with coconut aminos for a soy-free option.
- Brown rice: Use brown rice instead of white rice for more fiber. Cook time stays the same.
- Cauliflower rice: For a low-carb option, serve the chicken katsu over cauliflower rice and extra cabbage.
- Pork chops: This recipe works great with thin boneless pork chops. Cook time may vary slightly.
- No egg: If you have an egg allergy, try dipping the chicken in buttermilk or a mixture of milk and cornstarch.
- Oil-free: You can skip the oil spray if you must, but the coating won't be as golden or crisp.
Instructions
- Prepare the chicken: Place each chicken breast between two sheets of plastic wrap or wax paper. Use a rolling pin or the flat side of a meat mallet to pound them to an even thickness of about 1/2 inch. This ensures even cooking.
- Season: Pat the chicken dry with paper towels. Season both sides generously with salt and black pepper.
- Set up breading station: In one shallow bowl, place the flour. In a second bowl, beat the eggs with a splash of water. In a third bowl, pour the panko breadcrumbs.
- Coat the chicken: Dredge each chicken breast first in flour, shaking off excess. Dip into the egg wash, letting any excess drip off. Finally, press into the panko crumbs, coating both sides well. Use your hands to gently press the crumbs onto the chicken so they adhere firmly.
- Preheat air fryer: Set your air fryer to 400°F (200°C). Let it preheat for 3 minutes.
- Spray the basket: Lightly spray the air fryer basket with oil to prevent sticking.
- Arrange the chicken: Place the breaded chicken breasts in a single layer in the air fryer basket. Do not overcrowd. If your basket is small, cook in batches.
- Spray with oil: Lightly spray the top of the chicken with oil. This helps the panko turn golden and crispy.
- Air fry: Cook at 400°F for 8 minutes. Flip the chicken carefully using tongs, spray again with oil, and cook for another 6-8 minutes, until the internal temperature reaches 165°F (74°C) and the coating is deep golden brown.
- Rest the chicken: Transfer the cooked chicken to a cutting board and let it rest for 2-3 minutes. This helps the juices redistribute.
- Assemble the bowls: Divide the cooked rice among bowls. Top each with a generous mound of shredded cabbage. Slice the chicken katsu into strips and arrange over the cabbage.
- Drizzle with sauce: Spoon the katsu sauce over the chicken, or serve it on the side. Garnish with sesame seeds and green onions if desired. Serve immediately.
Pro Tips
- Pound the chicken evenly: This is the most important step. Uneven chicken will cook unevenly, with thin parts drying out and thick parts remaining undercooked.
- Use real panko: Don't substitute regular breadcrumbs. Panko's larger, flakier texture is what creates that iconic crunchy crust.
- Don't skip the oil spray: A light spray of oil on the panko coating is what makes it turn golden and crisp in the air fryer. Without it, the coating may look pale and dry.
- Work in batches if needed: Overcrowding the air fryer basket leads to steaming instead of crisping. Leave a little space between pieces.
- Check temperature early: Air fryer models vary. Start checking for doneness at the 12-minute mark. A meat thermometer is your best friend.
- Shred cabbage ahead: You can shred the cabbage up to a day in advance and store it in the fridge. This speeds up dinner assembly.
- Double the sauce: The homemade katsu sauce is delicious and you'll want extra for dipping. Make a double batch and keep it in the fridge for up to a week.
- Rest the chicken: Letting the chicken rest after air frying keeps it juicy. Slicing it immediately will cause the juices to run out.
- Keep rice warm: If you're cooking chicken in batches, keep the rice warm in a covered bowl or in a microwave-safe dish.
Variations and Substitutions
- Spicy katsu bowls: Add 1/2 teaspoon cayenne pepper to the panko crumbs or stir sriracha into the katsu sauce for heat.
- Curry katsu: Serve the chicken katsu over Japanese curry rice. Use the same chicken but pour curry sauce over everything.
- Katsu salad bowls: Skip the rice and double the cabbage for a low-carb salad bowl. Add avocado and cherry tomatoes.
- Teriyaki katsu bowls: Instead of katsu sauce, glaze the cooked chicken with teriyaki sauce and sprinkle with sesame seeds.
- Vegetable add-ins: Toss shredded carrots, bell peppers, or snap peas on top of the cabbage for extra color and crunch.
- Pork katsu: Use thin boneless pork chops (about 1/2 inch thick) and follow the same instructions. Pork should reach 145°F.
- Gluten-free version: Use gluten-free panko and tamari instead of soy sauce for the sauce. The coating won't be as crunchy but will still be good.
- Keto bowls: Replace rice with cauliflower rice and serve with extra cabbage. Use a sugar-free ketchup for the sauce to lower carbs.
Storage and Reheating
Fridge
- Store any leftover chicken katsu and cabbage separately in airtight containers. The chicken will stay good for up to 3 days. Keep the sauce in a separate small container.
- Do not store assembled bowls, as the cabbage and rice will become soggy.
Freezer
- You can freeze the cooked chicken katsu. Let it cool completely, then wrap each piece tightly in plastic wrap and place in a freezer-safe bag. It will keep for up to 2 months.
- Freeze the cabbage? Not recommended. It will turn mushy when thawed.
- Freeze the rice in a separate bag. Reheat directly from frozen.
Reheating
- Air fryer: Reheat chicken katsu in the air fryer at 350°F for 3-4 minutes until hot and crispy. This is the best method.
- Oven: Place on a baking sheet in a 350°F oven for about 5-7 minutes.
- Microwave: Not recommended for the chicken, as it will become soggy. Microwave the cabbage and rice, but reheat the chicken separately for best texture.
- For the sauce: Just microwave for 15 seconds or serve cold.
FAQ
Can I use pre-shredded coleslaw mix? Yes, coleslaw mix (shredded cabbage and carrots) works perfectly and saves time. Just use it straight from the bag.
How do I make the chicken extra crispy? Make sure to use panko breadcrumbs, not regular ones. Also, spray the coating generously with oil before air frying. For an extra crunch, you can double bread the chicken: repeat the flour-egg-panko steps.
Can I make these bowls ahead of time for meal prep? Absolutely! Cook the chicken and rice, shred the cabbage, and prepare the sauce. Store everything separately in the fridge. Assemble bowls just before serving for the best texture.
My chicken stuck to the air fryer basket. What went wrong? Make sure you spray the basket well with oil before adding the chicken. Also, the coating can stick if the chicken isn't fully dry before breading. Let the breaded chicken rest for a few minutes on a plate before air frying.
What can I substitute for Worcestershire sauce in the katsu sauce? You can use a mixture of soy sauce, a splash of vinegar, and a pinch of sugar. Or use fish sauce for a different flavor.
Is this recipe gluten-free? As written, it contains gluten from the flour and panko. To make it gluten-free, use gluten-free all-purpose flour and gluten-free panko breadcrumbs. Use tamari in place of soy sauce.
How do I know when the chicken is cooked through? The safest way is to use an instant-read thermometer. Insert it into the thickest part of the chicken breast; it should read 165°F. The coating should be deep golden brown and the juices should run clear.
Can I use this recipe for chicken tenders? Yes! Cut the chicken breasts into strips instead of pounding them flat. Adjust the cooking time to about 8-10 minutes total, flipping halfway. They make great finger food for kids.
Nutrition Information
Nutritional values are estimated and can vary depending on the ingredients used.
Save this recipe
Print and download options unlock in 30 seconds.
